Friday 26 July 2013

10 new features in Android 4.3 Jelly Bean

| |
1 comments
nexus7-front-and-back-635.jpgGoogle has announced the roll out of the next iteration of its Android operating system, dubbed as version 4.3, with the launch of its new Nexus 7 tablet. The new version will be called 'Jelly Bean' and would actually be the third version to carry the same tag after Android 4.1 and Android 4.2. The latest update comes about nine months after Google introduced Android 4.2.
However as suggested by previous leaks, the new Android version doesn't bring a big makeover and comes with a few major features. The new OS is being rolled out first to Google's Nexus range of devices including the original Nexus 7, Nexus 4, Nexus 10 tablet and will ship with the new Nexus 7. We take a look at its new features.
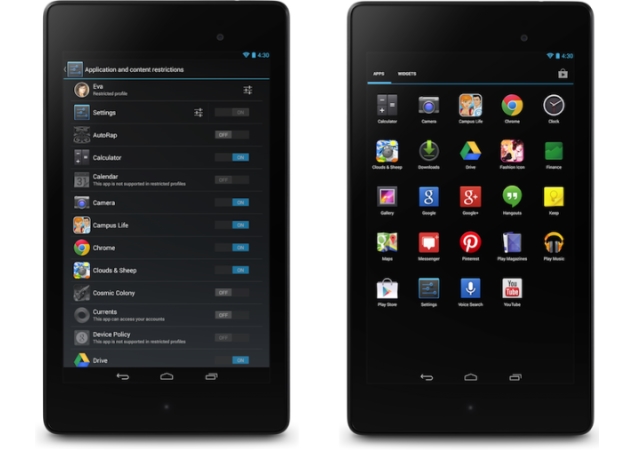
1. Restricted profiles
Google added multi-user profiles in the last iteration of Android and it seems the search engine giant wants to enhance that experience through restricted profiles. With the new feature, users can restrict app usage and content consumption on an Android device. So you'll be able to set profiles for each user of the device in case of multiple users. For instance, parents can control what apps or games their kids have access to on their tablets. However, it's worth pointing out that the new restricted feature is only available on Android tablets.
2. Bluetooth Smart Ready
Google seems to be making way for wearable technology by introducing the Bluetooth Smart Ready feature in Android 4.3. Devices running Android 4.3 will now support low-energy Bluetooth Smart accessories like heart rate monitors, pedometers, thermometers and many others. Users can now sync the low energy devices without these affecting the battery usage of the device, as per Google. This feature was missing on Google's mobile operating system, till now. This would also make way for Android friendly wearable tech.
3. Dial-pad Autocomplete
Android 4.3 now adds the autocomplete feature in the dial-pad suggesting contact names or phone numbers when users start keying-in something. This is not a new feature as OEMs like Samsung and HTC had already introduced this feature on to their UI skins running on top of Android, but devices running stock Android were missing it. Users can initiate the feature by going to the app settings and enabling 'Dial Pad autocomplete'
4.Notification Access
The Notification bar has been a popular feature on Android and with Android 4.3, you can control and interact with the status bar notifications. This would allow users to control how notifications are pushed to the primary and connected devices(smart watches, fitness bands). Users will also be able to see all the notifications at one place.
5. OpenGL ES 3.0
If you are a gaming junkie, the new update will definitely excite you. This feature would let Android devices render high quality graphics in games and other apps. Google claims that Android 4.3 supports the new version of the industry standard for high performance graphics. Google also gave a demo of a game showing detailed textures, lens flare, and reflections. This was missing in Android 4.2.
6. Simplified Setup Wizard
Android Jelly Bean now supports corrections to user inputs while signing-in to the device, the first time. This is due to more streamlined user agreements. Now a user can change the information that was keyed-in during the first boot of the device. Google has also introduced faster user switching from the lock screen in case of multiple users.
7. Bluetooth AVRCP
Google devices running Android 4.3 Jelly Bean can sync with Bluetooth enabled car stereos and offer additional functionality. The Bluetooth AVRCP 1.3 version allows stereos to display metadata such as song names when music is being streamed from an Android 4.3 device.
8. Location accuracy features via Wi-Fi scan only mode
Google has now increased the location accuracy of Android devices by allowing location scanning via Wi-Fi.
It now allows apps to get location data through Wi-Fi even when Wi-Fi is set to off and not being used for data access.
9. Keyboard & input
Android 4.3 comes with an upgraded algorithm for tap-typing recognition that makes text input easier while chatting via messages or even while composing emails. It also brings a new emoji keyboard, which we've previously seen in iOS. The update also adds lower latency input for gamepad buttons and joysticks.
10.Hindi support lands on Android 4.3
Google has introduced native local language support to its operating system for Africaans, Amharic, Hindi, Swahili and Zulu. Hindi has finally reached the stock Android operating platform.
With the update, Google has also added support for Hebrew and Arabic (right-to-left) in the home screen, Settings, Phone, People, and Keep apps.
Bonus - New Camera UI
Android 4.3 also offers a new updated Camera app that features a new arch based menu which makes it easier to control and switch camera settings.
Read More

10 Best Android Secret Tips and Tricks

| |
0 comments

Android is the Linux based operating system designed primarily for touch screen mobile phones. Now a days android phones are so much popular that they covered almost 65% of total mobile phones market.They are rich in functionality as well as user friendly. Many android users don’t know much about the hidden features of android phones. Today we are sharing an article which will tell you the best secret android tricks and hidden features of android phones. Different versions of android versions support different set of android tricks, so try all the following android tricks. I am not sure which will going to work on your handset.


 1) Force reboot: Many times android users face a problem of freezing of mobile phone, In case your android phone is frozen, you can reboot it using an android trick.

Just press Power Button+ Home Key + Volume up button simultaneously.

2) Quick Google Access:
Android phones built primarily for internet, many of android users don’t know that android phones provide a way by which we can access Google search in just a single click. To use this android trick,

Press menu key and hold it for couple of seconds, it will launch the Google search.

3) Reboot Android in safe mode: 
As like computers, we can also reboot android phones in safe mode. The latest android jelly bean version provides an option to reboot in safe mode, if something goes wrong.
To reboot your android in safe mode, follow the below given instructions.
*Long press the power button
*Long press on the power off option.

Android phone will show a confirmation message about rebooting it in safe mode, if we reboot android phone in safe mode then all the 3rd party application will be disabled. These applications can again be enabled when we reboot our phone normally. This is a great android utility in case when, one of your 3rd party application is causing trouble for you and you want to hunt it.

4) Unlock android phones by face detection: This is a cool android trick by which you can unlock your phone by using face detection, In the jelly bean version, android provides a way by which android phone can be unlock using face detection, to make this feature more secure, jelly bean version added another layer of protection in which android phone can be unlocked only when the face is matched as well as we have to blink eyes in order to unlock phone. Blinking eyes tells the android security system that person is live and it’s not an illegal attempt of unlocking using a still image.
To activate this,

Go to Settings > Security > Screen lock > Face unlock.

5) Get detailed information about phone status:
We can get the detailed statistics like phone information, battery information, usage statistics and WiFi information by just dialing *#*#4636#*#*
This is a handy USSD to get the details about battery usage, DNS check, Ping, Application time usage time and so on.

6) Move android apps to SD card: Its good idea to install android apps in SD card, but what if you installed apps on your phone memory. Don’t worry android phones provide a way by which we can move our apps to SD card. To move apps to SD card, follow these steps:

Go to settings > Application settings > Manage application > Select the application, You will see the option “Move to SD card”.

7) Hard Reset and Factory reset your android phone: 
This android trick comes handy at the time of selling an android phone. Android phone can be formatted in two ways

  • Factory reset
  • Hard reset
a) Factory reset: In factory reset, your phone is being formatted to factory level. Means all the settings will go by default and all the internal data will be deleted. To factory reset a phone dial *#*#7780#*#*.

b) Hard reset: 
To hard reset a phone dial *2767*3855#, this will delete all the data (including internal and External SD data) as well as settings of android phone. Don’t try this code for testing purpose, until you are not sure. It will not ask for a confirmation.

8) Context menu in android:long press on the screen, will show you additional options for customizing android phones. This context menu is somewhat similar to the right click menu of most operating systems.

9) Taking screen shots on android phone:
 Android phones offer a great feature by which we can take the screen shot without using any 3rd party application. However the screen shot android tricks vary from one android version to another version.

  • Press the Home button + power button (This trick work on most android phones.)
  • For Galaxy Nexus: Power button + volume down button.
  • For Galaxy Note 2 and S3: Swipe your palm on the screen to take screen shot.

10) Android Version Animation: 
This is another cool android trick to play with your android phone.
To use this android trick, Go to settings > about phone > Tab repeatedly on ‘Android version’.
After sometime, the android version will be animated.
- See more at: http://the-technogeek.blogspot.in/2013/05/10-best-android-secret-tips-and-tricks.html#sthash.Xet5q7OO.dpuf
Read More

Wednesday 10 July 2013

Upcoming PC Games:Grand Theft Auto V

| |
0 comments
Almost everybody in this gaming arena knows about Grand Theft Auto vice city game. It is the most played game by anyone; Unique Feature is that it can be played on low end configured PCs . Rockstar games are the producers of the GTA series. Going back into the time GTA vice city, San Andreas and GTA IV are the series which were bought up. Great changes have been made from vice city to GTA IV in the Aspects of graphics, gameplay and visuals. Everything was improved from version by version of the gaming series. Now friends it’s time to say welcome to a new level of Reality in Grand Theft Auto V (GTA V).
GTA five


The game has always been about the robbery.Talking about the game, whole new Elements are added. We’d like to appreciate the hard work that Rockstar games had put in to create a masterpiece. You can just feel the reality in the game; It involves southern California covering mountains, ocean, streets and expensive shops etc. For the first time in the history of the game there are 3 heroes lined up. These 3 turns out to be the most wanted thieves in the city of crime. The game just revolves around these Three men, now you might be wondering how you can play three heroes in game? Here Comes the interesting part of the game there is a toggle between the heroes i.e. You can just enter perspective of any hero and accomplish the mission.

Trailer:

 In this game also, three guys are involved in all robberies happening in the Town. Primarily these three men plan the robbery together and execute it Successfully. After the robbery they distribute the cash among them, and then   the money can be spent to buy  things like car, bike, tattoos Etc. The cool added features in the game are diving into the ocean, entering chopper and Fighting with the cops, and every detail is provided when you jump from a building. Tasks are provided on the map. Complete all tasks to  accomplish the game.


ConclusionIt has been said that great Improvements have been made in the gameplay and the game provides a good stability Too. That is what a good game needs. Let’s hope GTA V may have a great opening in Market. Sources say that GTA V is going to be released in September, 2013.

Read More

Saturday 4 May 2013

Some Important Commands On Cmd

| |
0 comments


Command Prompt (executable name cmd.exe) is the Microsoft-supplied command-line interpreter on OS/2, Windows CE and on Windows NT-based operating systems (including Windows 2000, XP, Vista, 7, 8, Server 2003, Server 2008, Server 2008 R2 and Server 2012). It is the analog of COMMAND.COM in MS-DOS and Windows 9x systems (where it is called MS-DOS Prompt), or of the Unix shells used on Unix-like systems.

[Image: Command_Prompt.png]

Now let me go straight to the main topic :

Here is some cool commands of CMD --------->

ipconfig :


This is the top most command for seeing the ip address,subnet mask and default gateway also includes display and flush DNS cache, re-register the system name in DNS.. This will most useful tool for viewing and troubleshooting TCP/IP problem.
  • To view ip ,subnet mask address : ipconfig
  • To view all TCP/IP information, use: ipconfig /all
  • To view the local DNS cache, use: ipconfig /displaydns
  • To delete the contents in the local DNS cache, use: ipconfig /flushdns

systeminfo

Have a need to display operating system configuration information for a local or remote machine, including service pack levels? Then systeminfo is the tool to use. When I need to connect to a system that I am not familiar with, this is the first tool I run. The output of this command gives me all the info I need including: host name, OS type, version, product ID, install date, boot time and hardware info (processor and memory). Also knowing what hot fixes are installed can be a big help when troubleshooting problems. This tool can be used to connect to a machine remotely using the following syntax: SYSTEMINFO /S system /U user

tasklist and taskkill 

If you work with Task Manager (ctrl+alt+del) ,you can easily understand this.Task list is list of task which are running on windows currently. If you open any application,it will be added to task.To List the Tasks type in cmd as :tasklistThis will show the list of task which are running.To stop the Process or task ,there is two methods :Using Image Name:We can kill the task using its Image Name as follows:tasklist /im notepad.exeUsing Process Id:we can stop the process using its process id as follows :tasklist /pid 1852

 type

type is used to read the text document in command prompt . You can read multiple text in continuously..

type filename.txt

netstat

Need to know who (or what) is making a connection to your computer? Then netstat is the tool you want to run. The output provides valuable information of all connections and listening ports, including the executable used in the connections. In additon to the above info, you can view Ethernet statistics, and resolve connecting host IP Addresses to a fully qualified domain name. I usually run the netstat command using the -a (displays all connection info), -n (sorts in numerical form) and -b (displays executable name) switches

net command

Although this tool is more known as a command, the net command is really like a power drill with different bits and is used to update, fix, or view the network or network settings.It is mostly used for viewing (only services that are started), stopping and starting services:

net stop servernet start servernet start (display running services)and for connecting (mapping) and disconnecting with shared network drives: net use m: \\myserver\sharenamenet use m: \\myserver\sharename /deleteOther commands used with net command are, accounts (manage user accounts), net print (manage print jobs), and net share (manage shares).Below are all the options that can be used with the net command.

[ ACCOUNTS | COMPUTER | CONFIG | CONTINUE | FILE | GROUP | HELP |HELPMSG | LOCALGROUP | PAUSE | PRINT | SESSION | SHARE | START |STATISTICS | STOP | TIME | USE | USER | VIEW ]

nslookup

With the Internet, DNS (Domain Name Service) is the key for allowing us to use friendly names when surfing the web instead of needing to remember IP Addresses. But when there are problems, nslookup can be a valuable tool for testing and troubleshooting DNS servers.Nslookup can be run in two modes: interactive and noninteractive. Noninteractive mode is useful when only a single piece of data needs to be returned. For example, to resolve google.com:

[Image: image.gif]

To use the interactive mode, just type nslookup at the prompt. To see all available options, type help 

[Image: image.gif]

Don't let the help results intimidate you. Nslookup is easy to use. Some of the options I use when troubleshooting are:set ds (displays detailed debugging information of behind the scenes communication when resolving an host or IP Address).set domain (sets the default domain to use when resolving, so you don't need to type the fully qualified name each time).set type (sets the query record type that will be returned, such as A, MX, NS)server NAME (allows you to point nslookup to use other DNS servers than what is configured on your computer)To exit out of interactive mode, type exit

ping and tracert 


These tools can be helpful with connectivity to other systems. Ping will test whether a particular host is reachable across an IP network, while tracert (traceroute) is used to determine the route taken by packets across an IP network.To ping a system just type at the prompt: ping http://www.google.com. By default, ping will send three ICMP request to the host and listen for ICMP “echo response” replies. Ping also includes switches to control the number of echo requests to send (-n ), and to resolve IP addresses to hostname (-a ).To use tracert, type at the prompt: tracerthttp://www.google.com. You can force tracert to not resolve address to hostnames by using the -d switch, or set the desired timeout (milliseconds) for each reply using -w switch.

gpresult

Used mostly in environments that implement group poicies, gpresults (Group Policy Results) verifies all policy settings in effect for a specific user or computer. The command is simple to use, just enter gpresults at the prompt. It can also be used to connect to computers remotely using the /S and /U switches.

Netsh

Without a doubt the most powerful command line tool available in Windows. Netsh is like the swiss army knife for configuring and monitoring Windows computers from the command prompt. It capabilities include:
  • Configure interfaces
  • Configure routing protocols
  • Configure filters
  • Configure routes
  • Configure remote access behavior for Windows-based remote access routers that are running the Routing and Remote Access Server (RRAS) Service
  • Display the configuration of a currently running router on any computer
Some examples of what you can do with netsh:Enable or disable Windows firewall:

Code:
netsh firewall set opmode disablenetsh firewall set opmode disable
Enable or disable ICMP Echo Request (for pinging) in Windows firewall:

Code:
netsh firewall set icmpsetting 8 enablenetsh firewall set icmpsetting 8 disable
Configure your NIC to automatically obtain an IP address from a DHCP server:

Code:
netsh interface ip set address "Local Area Connection" dhcp
(For the above command, if your NIC is named something else, use netsh interface ip show config and replace the name at Local Area Connection). 
Read More

Sunday 28 April 2013

How to Scan Your Blogger Site for Malware Script

| |
2 comments


While choosing a Blogger template people often gets confused whether this template is potentially free from any kind of malware or the developer have incorporated some malicious scripts. Probably, the ideal way to tackle such malicious templates is to scan them through different tools available on the internet. It is always a good thing to inspect your Blogger site on a daily basis by scanning it for potential malware and etc. In this article, we will discuss a few quick ways on How to Scan Your Blogger site for Potentially Malware scripts.


Sucuri:

Sucuri is a globally recognize and by far the best Blogger security scanner. They offer a Free-to-use tool that scans your site and provides basic information whether there is any potential risk or not. However, if you are too much worried about your site’s security then you must try its Paid version because it provides a lot of in-depth details. To sum things up, after installing Sucuri it would keep an eye on your site 24x7 and would prevent your site from any security threat. Sucuri Blocks the IP of those users who are found doing suspicious activities. Additionally, they also send alert messages if they notice something Fishy going on your site. This does makes sense.

Believe it or not some leading companies like BBC, CNN, PC World, TechCrunch, TheNextWeb and other companies recommend these guys. These guys are too good and know how to handle things when you are away from your site.

VirusTotal Scanner:

VirusTotal is a subsidiary of Google, which is a free service that helps you to analyze suspicious files and URLs enabling you to identify worms, trojans, malwares and other suspicious files incorporated on your site. It allows you to scan your site on different leading antivirus engines and website scanners. Since, it is a Google service so you can rely on it.

To scan your site on VirusTotal, go to https://www.virustotal.com/en/#url and enter the URL of your site. Now as soon as you hit enter it would inspect your site across different leading scanners and would provide you in-depth details about your site’s security, and safety.

Comodo Web Inspector:

Comodo site inspector is another free tool that does the job quite impressively. It scans your site on the basis of Blacklist Checking, Phishing, Malicious Activity, Malware Downloads and Suspicious Activity. Often hackers target templates to inject links so, it protects your site from any kind of spammy links. Though, it doesn’t provide comprehensive details like Sucuri and VirusTotal but it is worth to check this free tool.

Note: This tool takes a while to scan your site, so please be inpatient when it is working. You can minimize the window and can continue with your work. It would notify you once the scanning is done.

We hope this article would help you to protect your site from any kind of malware or malicious scripts. We want to make this article a great resource for Blogger users, so if you have any better suggestions, then leave them in the comment below.
Read More

Monday 22 April 2013

Customize the new Facebook Timeline

| |
0 comments


Facebook has redesigned user profiles many times over, but the latest version offers the most control (so far) to the actual user. The main difference between the new version and the old version is that all updates and events will display on the right-hand side of the page. Information about you -- along with the samples of friends and photos -- will display on the left side. Unlike the last design, which looked similar to a game of ping-pong happening on your Timeline, this revamp lets you focus on reading updates from friends.
Now for the most useful new feature: the ability to choose which sections will display on your Timeline. Instead of having blank sections on your profile, you can toggle them off. You can even toggle sections off that you've already filled out, if you changed your mind about displaying them. And thankfully Facebook saves the information, so if you toggle it back on later, it will still be filled out.
Ready to start customizing? Just be aware that the About, Friends, and Photos sections cannot be toggled off -- though you can customize their privacy settings.
To pick the sections you want to display on your Facebook Timeline, simply drag your mouse over the About or Friends boxes on the left-hand side. You'll see a small pencil icon appear in the top right-hand corner of that box. Click it and then select Edit sections.
Next, a list of the sections you have available for editing will pop up. If you have apps that post to Facebook on your behalf, you will see them in the list. Put a check next to the sections you want to display. To reorder the sections, simply drag them through the list.
Now you'll only show off the sections you want to, without seeing big gaps for information you decided to leave out.
What do you think of the new Timeline design? Share your thoughts in the comments!
Read More